PaperCut – MacBook
Installing PaperCut Printing software
1. Start and Log into the Mac computer. Ensure it's connected to the WSC-Secure network by clicking the Wifi icon in the Menu bar.
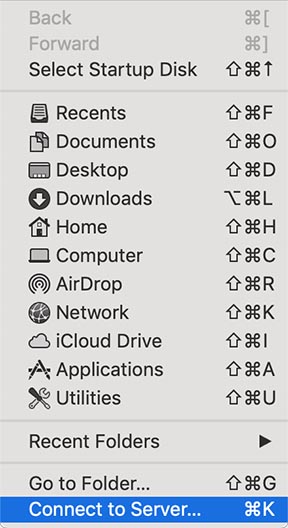
2. Open Finder and select Go in the Menu bar.
3. From the Go menu, select Connect to Server....
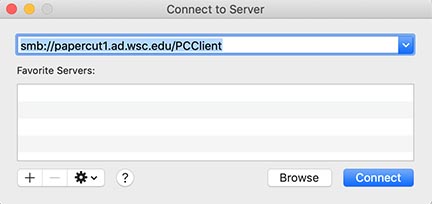
4. Enter the server connection details: smb://papercut1.ad.wsc.edu/PCClient into the Server Address textbox and click Connect.
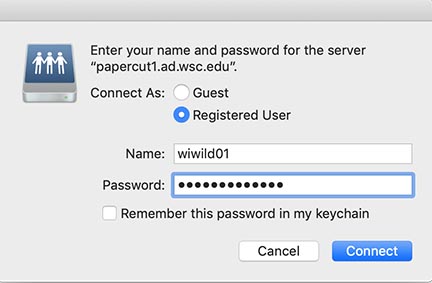
5. When prompted, Enter your WSC username and password information and click Connect.
Note: You may need to replace your computer username with your WSC username.
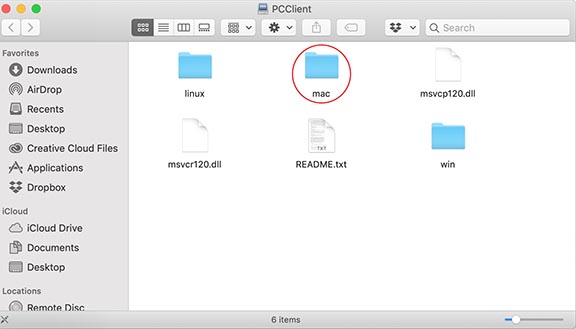
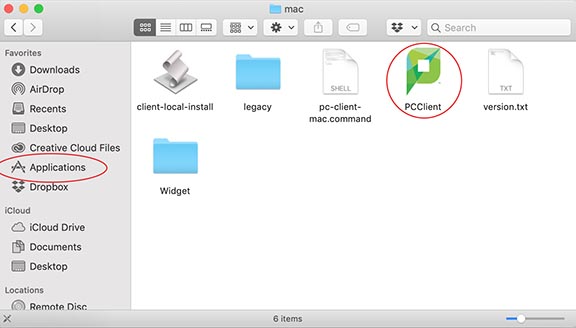
6. A Finder window will now open. Double click the Mac folder and drag the PCClient into your Applications folder (can be found in the sidebar of the Finder window).
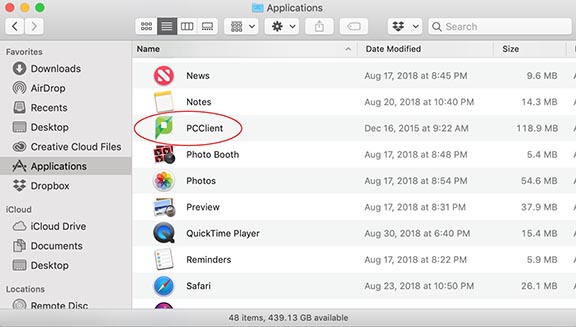
7. When the PCClient is copied to the Applications folder, click Applications in the sidebar to navigate to the folder.
8. Using either Launchpad, system search, or the Applications folder, open PCClient.
9. Login with your WSC username and password.
Installing PaperCut printers
1. Download the PaperCut installer and follow the instructions.
Note: Each time you login, restart or turn on your computer you will have to open the PaperCut Client program to print.
Sending a Print Job
1. In the document you want to print, select File then Print, to bring up the print dialog box. There will be a drop down menu to select a printer. Select which printer (i.e. HP_BW_FollowMe) you want to send the job to.
- If you’re using Google Chrome and the WSC printers are not showing up, select the Print using system dialog option in the lower left.
2. The print dialog box is where you can change the print settings for the document you’re about to print. Select the settings such as the number of copies, two sided or one sided print, page range, how many slides per page if it’s a PowerPoint, etc., and click Print.
- In some applications to select a two sided or a one sided print, select Copies & Pages, select Layout from the dropdown menu, and under Two-Sided select Long-Edge binding if you want it two-sided or off if you want one sided.
3. In some cases it takes a few seconds, but another box will pop up, this time from PaperCut. If you haven’t logged into PaperCut recently it’ll ask you to log in.
4. Next, you’ll get a print job confirmation window with the option to select which budget code to charge for the print. For students, it is the Personal Account.
5. Select Print to send your print job to the printer.
6. Finally, once the job has been successfully submitted, PaperCut will send you a notification to let you know the job has been “released to your queue”.
How to Release a Print Job
Please contact the Campus Service Center at 402-375-7107 or visit us in the library for further assistance.
Last Updated: 7/16/2020